
Commercial moisture mapping is how restoration crews find water you cannot see. After a leak, the floor may look dry and the walls may look fine. Yet water can hide behind drywall, under tile, inside ceiling cavities, and deep in concrete. If nobody finds it, that hidden water feeds mold, rots framing, and ruins new finishes weeks later. A careful moisture map shows exactly where water went and when each area is truly dry. This guide explains how the process works, which tools crews use, and why it matters for your building and your claim.
Facility managers, property owners, and adjusters can use it to ask better questions after any water loss.
What Is Commercial Moisture Mapping?
Put simply, a moisture map is a floor plan marked with readings. Technicians take readings across floors, walls, and ceilings. Then they mark each reading on the plan. Wet spots stand out, and the edges of the wet zone become clear.
The map is not a one-time task. Instead, crews update it every day during drying. As a result, it becomes a record of the whole job, from the first day to the last.
Why Water Hides in Commercial Buildings
Water follows gravity and the path of least resistance. For example, it runs along floor tracks inside walls. Drywall soaks it up from the bottom, and the wet line slowly climbs. Under vinyl and tile, water slips into seams. Some of it also drips through floor openings to the level below.
Commercial buildings make this worse. They have long runs of wall, raised floors, drop ceilings, and shared cavities between suites. So a leak in one room can show up three rooms away. Without commercial moisture mapping, crews may dry the obvious area and miss the rest.
Tools Used in Commercial Moisture Mapping
Technicians use several tools, and each one has a job:
- Pinless meters scan surfaces without damage, so they work well for quick sweeps.
- Pin meters push small probes into materials to measure moisture inside.
- Thermal cameras show cool spots where water may be evaporating.
- Thermo-hygrometers measure air temperature and humidity.
- Concrete tests check moisture deep inside slabs.
No single tool tells the whole story. For instance, a thermal camera can show a cool patch, but that patch could be an air leak instead of water. So crews confirm every suspect spot with a meter.
Step 1: Set Dry Reference Points
First, technicians find dry areas made of the same materials. They take readings there to set a baseline. This step matters because “dry” varies by material. For example, dry drywall reads very differently from dry wood. Later, every wet reading is compared with these baselines.
Step 2: Sweep the Affected Area
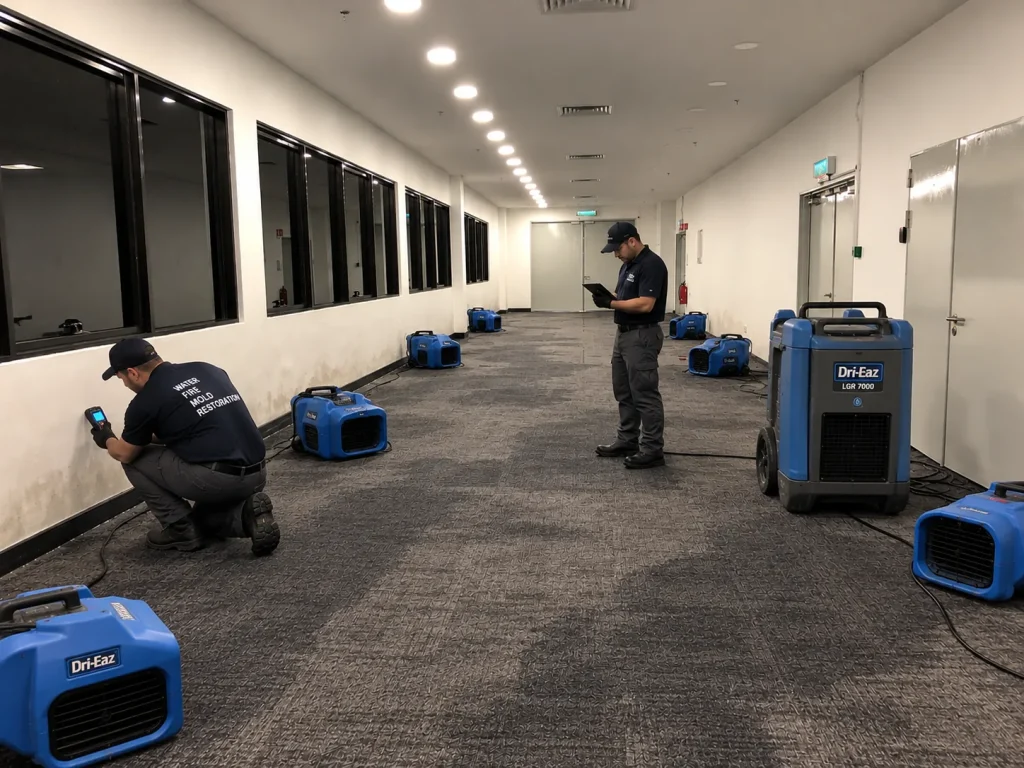
Next, crews sweep floors and walls with pinless meters. They start at the source and work outward. Then they keep going until readings match the dry baseline. In many cases, this sweep finds water well past the visible stain.
Step 3: Check Behind Walls
Walls are the trickiest part. Water often sits at the bottom plate, hidden behind baseboards. To find it, technicians take readings low on the wall, just above the floor. If those readings are high, they may pull baseboards or drill small holes to check inside the cavity.
Insulated walls need extra care. Insulation can hold water against the back of the drywall for a long time. So crews may need to open the wall to dry it properly.
Step 4: Check Under Floors
Floors hide water too. Under vinyl, tile, or laminate, water can stay trapped for weeks. Similarly, carpet pad can stay soaked while the carpet face feels dry. Technicians use meters through the flooring and check seams and edges. In some cases, they lift a corner to look directly.
Concrete slabs need special tests. A slab can feel dry on top yet hold water inside. If new flooring goes down too soon, the adhesive may fail. For that reason, flooring makers often set moisture limits that must be met first.
Step 5: Check Ceilings and Lower Floors
In multi-story buildings, water often travels down. So crews check ceiling tiles, ceiling cavities, and the suite below. Thermal cameras help a lot here. After that, technicians confirm any cool spots with meters.
Commercial Moisture Mapping During Drying
Once drying begins, the map guides every move. Technicians take readings at the same points every day. Then they compare the numbers with the dry baseline. As areas dry, crews move air movers and dehumidifiers to the spots that are still wet.
This daily cycle saves time and money. Equipment runs only where it is needed. In addition, crews know exactly when to remove it. Our structural drying page explains how the equipment works.
How Commercial Moisture Mapping Supports Insurance
Insurers want proof. A daily moisture log shows where the water went, what crews did, and when the job was done. It also explains why crews removed some materials and kept others. As a result, claims often move faster and face fewer disputes.
Ask your contractor for copies of the map and daily readings. Keep them with your photos and invoices. Our restoration documentation post covers what else to save.
Signs You Need Commercial Moisture Mapping
You may need a map even if the water seems gone. Watch for these signs:
- A musty smell that lingers after cleanup
- Baseboards that swell, peel, or separate
- Stains that grow on ceilings or walls
- Flooring that lifts, buckles, or feels soft
- Paint that bubbles or cracks
- A leak that ran for an unknown amount of time
Any of these can point to hidden water. Our post on hidden commercial water damage covers more warning signs.
Mapping and Mold Prevention
Mold needs moisture to grow. In fact, it can start within a day or two on wet materials. So finding and drying hidden water is the best way to stop it. Guidance from the U.S. EPA on mold shows how quickly growth can begin.
If mold is already present, the map still helps. It shows which areas need cleanup and which are safe. Then crews can contain the work and avoid spreading spores.
Mistakes That Lead to Missed Water
- Relying on touch or sight instead of meters
- Skipping dry reference readings
- Checking only the room where the leak started
- Forgetting the floor below
- Stopping readings once the surface feels dry
- Closing walls before final readings are taken
Each mistake can leave water behind. Unfortunately, the damage often shows up only after new finishes are in place.
How Long Does Commercial Moisture Mapping Take?
The first map usually takes a few hours, depending on building size. After that, daily checks are faster, since crews revisit the same points. A full job may include readings for three to seven days, or longer for dense materials.
FAQ on Commercial Moisture Mapping
Is commercial moisture mapping worth the cost?
Yes. It prevents missed water, which is far more costly to fix later.
Can thermal cameras see through walls?
No. They show surface temperature only. Cool spots must be confirmed with a meter.
Will mapping damage my walls?
Usually not. Most readings use pinless meters. Pin meters leave tiny holes that are easy to patch.
Find Hidden Water Before It Spreads
A good map turns guesswork into facts. Visit our water detection services page, or schedule an inspection for your building.
Related Reading
- Commercial Water Extraction — why removing standing water is only the first step.
- Building Water Damage Repair Scope — the factors that set the size of a repair.
- The First 24 Hours of Cleanup — what happens on day one and why speed matters.
- Hidden Commercial Water Damage — why visible damage is rarely the full damage.
- Dry Does Not Mean Ready — when a building is actually safe to reoccupy.
- Commercial Restoration Documentation — why the evidence of the work matters as much as the work.